 |
| Holiday ornaments nail art |

Showing posts with label holidays. Show all posts
Showing posts with label holidays. Show all posts
14 December 2014
The Digit-al Dozen Does Winter Wonderland, Day Five: Holiday Ornaments
Hi everyone! It's very late here, so this will be a short post. For the final day of Digit-al Dozen week I wanted to do something I've done several times before. I tend to do holiday ornaments at least once per year (see here for the 2012 and here for the 2013 versions). This year I was inspired by Wondrously Polished's cute vintage ornaments from earlier this week, but of course I put my own spin on them.
27 December 2013
Guest Blog Post at Work Play Polish
Hi everyone! My nail art was recently featured in a guest post at Work Play Polish. I’ve admired Leslie’s blog for some time now, so I’m
very honored to have this opportunity. Not only that, this guest post
series was put together to support a great cause, making this an even more
positive experience.
 |
| Holiday mosaic nails |
25 December 2013
Girly Bits Get Weaponized and Merry Christmas!
Hi everyone! Merry Christmas if you celebrate, and if you don't, I hope you had a relaxing day of movies and Chinese food! It seems odd to be wearing a polish with such an aggressive name for my Xmas mani, but I couldn't have asked for something more perfect, or gorgeous. It also was the ideal base for some snowflakes so make sure to check out the full post.
 |
| Girly Bits Get Weaponized |
16 December 2013
Four Weeks of piCture pOlish + The Digit-al Dozen Does Red, Gold, and Green
Hi everyone! Along with falling behind on my posts for the Digit-al Dozen this week, I also fell behind on my piCture pOlish posts. I tend to dislike publishing posts that serve a dual purpose, for some reason it feels like cheating for me. However, the ladies at piCture pOlish sent me the gorgeous red O'Hara, and it was perfect for this week's Digit-al Dozen challenge.
So this week's piCture pOlish post features the O'Hara in a holly design inspired by one of my favourite nail artists Lindsey at Wondrously Polished.
 |
| piCture pOlish O'Hara |
So this week's piCture pOlish post features the O'Hara in a holly design inspired by one of my favourite nail artists Lindsey at Wondrously Polished.
15 December 2013
The Digit-al Dozen Does Red, Gold, and Green: Day Two: A Classic Holiday Gradient
Hi everyone! You may have noticed (or not!) that I didn't published many posts for The Digit-al Dozen challenge this week. The prompt was red, gold, and green, but because of my work with my day job (teaching assistant) and my dissertation, it was just impossible for me to do any nail art this week. So I have one post for you today, and I'll have one more tomorrow, then I'm giving up on this challenge.

This design is super easy but perfect for the holidays. I've used two Renaissance Custom Lacquer polishes to do a gradient that is very classic and shimmery!

This design is super easy but perfect for the holidays. I've used two Renaissance Custom Lacquer polishes to do a gradient that is very classic and shimmery!
09 December 2013
L'Hiver, The Perfect Backdrop for Holiday Ornaments
Hi everyone! Another week, another entry for the Nail Polish Canada Holiday Nail Art Challenge. The theme for this week was decorations, and I'll admit it was pretty difficult to try and come up with an interesting slant for this one. However, I was able to use some polishes from my indie line, Renaissance Custom Lacquer, so I'm very proud of the results.
 |
| Holiday ornaments nail art |
05 December 2013
China Glaze Dash of Dazzle Set: Swatches, Nail Art, and Review
Hi everyone! For the holidays China Glaze has released a number of small gift sets of polishes. They are great stocking stuffers, and so I was fortunate that Nail Polish Canada sent me one of the sets for review. The Dash of Dazzle set contains three polishes from the Happy Holi-Glaze collection - Bells Will Be Blinging, Mingle With Kringle, and So Blue Without You. (Note: In my initial review I forgot to mention that all three are full-sized polishes) The three polishes complement each other perfectly and they are great for doing festive nail art.
But first let's take a look at some swatches...
 |
| China Glaze Dash of Dazzle set |
But first let's take a look at some swatches...
04 July 2013
Fourth of July Nail Art With Shimmer Nichole
Hi everyone! Even though I live in Canada, I have family in the United States, I used to live there, and I recently became a US Permanent Resident. So to celebrate my first Independence Day as a Green Card holder, I decided to do some red, white and blue nail art.

Like a lot of people I took the opportunity to use Shimmer Polish Nichole, part of the package sent to me by Cindy of Shimmer Polish. Nichole is a clear-based glitter topper with silver, red, and blue micro and hex glitter of different sizes. Some of the small hex glitter is holographic. It really is stunning and easy to apply. On my index finger I used one coat, so there is also great glitter payoff.
The red is OPI Magazine Cover Mouse, and the blue is Zoya Song. For the white I used Sally Hansen White On. The black outlines of the stars are done with Orly Liquid Vinyl.
The stripes I did freehand of course. For the stars, I painted the star with black polish, then filled it in with white. My final step was to dab on some glitter. Everything was topped off with KBShimmer Clearly On Top, which is an excellent top coat. I've started to use it for nail art and I find it doesn't smear my designs like Seche Vite does.
Shimmer Polish is available on Etsy, from Harlow & Co., and Overall Beauty. Follow Shimmer on Facebook, and the Shimmer Polish blog for updates.
What do you think of this? Did you do some nail art for the Fourth of July?
*Shimmer Polish provided for review, all opinions are my own. See my disclosure policy for more details.*
Like a lot of people I took the opportunity to use Shimmer Polish Nichole, part of the package sent to me by Cindy of Shimmer Polish. Nichole is a clear-based glitter topper with silver, red, and blue micro and hex glitter of different sizes. Some of the small hex glitter is holographic. It really is stunning and easy to apply. On my index finger I used one coat, so there is also great glitter payoff.
| Fourth of July nail art |
| Fourth of July nail art |
The red is OPI Magazine Cover Mouse, and the blue is Zoya Song. For the white I used Sally Hansen White On. The black outlines of the stars are done with Orly Liquid Vinyl.
| Fourth of July nail art |
| Fourth of July nail art |
The stripes I did freehand of course. For the stars, I painted the star with black polish, then filled it in with white. My final step was to dab on some glitter. Everything was topped off with KBShimmer Clearly On Top, which is an excellent top coat. I've started to use it for nail art and I find it doesn't smear my designs like Seche Vite does.
Shimmer Polish is available on Etsy, from Harlow & Co., and Overall Beauty. Follow Shimmer on Facebook, and the Shimmer Polish blog for updates.
What do you think of this? Did you do some nail art for the Fourth of July?
*Shimmer Polish provided for review, all opinions are my own. See my disclosure policy for more details.*
01 July 2013
Happy Canada Day!
Hi everyone! First off, I wanted to say thanks to everyone who entered my giveaway. I've chosen the two winners via random draw so congrats to Tanya Jung and Jennifer Markus Lee. Please respond to my email within 48 hours.
I was really touched by all the nice comments and things many of you had to say about my blog, and the new followers and support. Giveaways make me nervous because I always worry that there's going to be a mass exodus after the giveaway. But hopefully some people will stick around! As long as these giveaways are drama free, I'll continue to do them because I enjoy them, and so do you! So if you didn't win this time, hopefully you will next time. :)
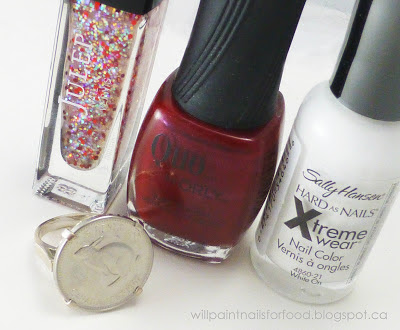
So happy Canada Day to all you Canucks and Canuck-wannabes who celebrate. I originally wasn't going to do a Canada Day manicure, but I remembered that I had Julep O Canada! waiting to be tried. Instead of going with the usual maple leaf, I decided to do some freehand hearts on sticks.
For the red I used Quo Old Hollywood, one of my favourite all time reds. If you don't have access to Quo, Orly Forever Crimson is a dupe. The white is Sally Hansen White On, and I did a bit of black outlining on the hearts with Orly Liquid Vinyl. The glitter is the Julep of course - it's a clear based glitter topper with small red hexes and iridescent hexes. I love the simplicity of it.
For the occasion I also thought I'd show off my ring I bought a while back from Coin Coin Designs & Co. It's my friend's company and she sells keepsake coin jewelry, I'm so proud of her, and I love her products. This ring has a nickel from the Canadian centennial designed by artist Alex Colville. It's the only year that the nickel had a rabbit on it. Isn't it cute!? I thought it was the perfect accessory for Canada Day. :)
What do you think of this design? If you're Canadian, how did you celebrate Canada Day?
I was really touched by all the nice comments and things many of you had to say about my blog, and the new followers and support. Giveaways make me nervous because I always worry that there's going to be a mass exodus after the giveaway. But hopefully some people will stick around! As long as these giveaways are drama free, I'll continue to do them because I enjoy them, and so do you! So if you didn't win this time, hopefully you will next time. :)

So happy Canada Day to all you Canucks and Canuck-wannabes who celebrate. I originally wasn't going to do a Canada Day manicure, but I remembered that I had Julep O Canada! waiting to be tried. Instead of going with the usual maple leaf, I decided to do some freehand hearts on sticks.
 |
| Canada Day nail art |
 |
| Canada Day nail art with Coin Coin ring |
For the red I used Quo Old Hollywood, one of my favourite all time reds. If you don't have access to Quo, Orly Forever Crimson is a dupe. The white is Sally Hansen White On, and I did a bit of black outlining on the hearts with Orly Liquid Vinyl. The glitter is the Julep of course - it's a clear based glitter topper with small red hexes and iridescent hexes. I love the simplicity of it.
 |
| Canada Day nail art |
 |
| Canada Day nail art with Coin Coin ring |
For the occasion I also thought I'd show off my ring I bought a while back from Coin Coin Designs & Co. It's my friend's company and she sells keepsake coin jewelry, I'm so proud of her, and I love her products. This ring has a nickel from the Canadian centennial designed by artist Alex Colville. It's the only year that the nickel had a rabbit on it. Isn't it cute!? I thought it was the perfect accessory for Canada Day. :)
 |
| Canada Day nail art |
What do you think of this design? If you're Canadian, how did you celebrate Canada Day?
01 April 2013
Pysanky Anyone?
Hi everyone! Pysanky (or singular pysanka) are Ukrainian Easter eggs. I was hoping to get these done sooner, but I've been marking papers all weekend. But technically it is Easter Monday, so I guess I'm not too late. :D
I'm not Ukrainian, but I love the art of Ukrainian Easter egg decoration. The motifs come from a book that I checked out from the library, which has a lot of information about the art form and the symbolism of the motifs. What's interesting is that every single motif has a particular meaning, and a lot of the symbolism predates Christianity. So I hope I got the designs right and am not culturally offending anyone! I decided to stick to some of the simpler designs, but maybe next year I'll try the more elaborate ones. ;)
I don't have a lot to say about this design, and it's rather late here, so if you have any questions let me know. All polishes are from the OPI Euro Centrale collection, with the exception of the white, which is Sally Hansen White On. All of it was done freehand with the same detail brush.
What do you think of this design? Did you do anything special on your nails for Easter?
 |
| Ukrainian Easter egg (Pysanky) nail art |
 |
| Ukrainian Easter egg (Pysanky) nail art |
I'm not Ukrainian, but I love the art of Ukrainian Easter egg decoration. The motifs come from a book that I checked out from the library, which has a lot of information about the art form and the symbolism of the motifs. What's interesting is that every single motif has a particular meaning, and a lot of the symbolism predates Christianity. So I hope I got the designs right and am not culturally offending anyone! I decided to stick to some of the simpler designs, but maybe next year I'll try the more elaborate ones. ;)
 |
| Ukrainian Easter egg (Pysanky) nail art |
I don't have a lot to say about this design, and it's rather late here, so if you have any questions let me know. All polishes are from the OPI Euro Centrale collection, with the exception of the white, which is Sally Hansen White On. All of it was done freehand with the same detail brush.
 |
| Ukrainian Easter egg (Pysanky) nail art |
What do you think of this design? Did you do anything special on your nails for Easter?
05 March 2013
Happy Hands Feliz Navidad and Silent Night
Hi everyone! I have two gorgeous polishes for you tonight, unfortunately I believe both have been discontinued. But if you really like these, there's always the chance of getting them through a blog sale or swap. They are just too pretty not to share! ;)
Both Feliz Navidad and Silent Night were part of the small holiday collection Happy Hands put out. There were two other polishes, both glitter toppers I believe. I managed to get these on sale after the holidays, but I think they would be nice any time of year.
Feliz Navidad is a pale pink/cream coloured polish with a gold shimmer, pink glitter, tiny gold hex glitter, and small pink hex glitter. I'm starting to really love neutrals and nudes, and this one in particular is quite beautiful. It's very feminine and delicate. The formula was great, it went on smooth and I only needed two coats for full coverage.
Silent Night is a blue jelly that leans towards teal. It's packed with different sizes and shapes of sky blue glitter. It's super sparkly and shimmery, also it's very vibrant in colour. The formula was perfect and I used three coats here, although you may be able to get away with two. A bonus about this polish - the glitter seems to have a duochrome effect where it looks green in some lights. It's absolutely stunning!
I really loved both of these polishes, and plan to add more Happy Hands polish to my collection. One thing to note about both of these is that they have a strong smell. I believe it is caused by the pigments used to make the polish. It goes away after your nails dry, but I feel it should be noted.
What do you think of these? Do you own, or want to own any Happy Hands polishes?
Both Feliz Navidad and Silent Night were part of the small holiday collection Happy Hands put out. There were two other polishes, both glitter toppers I believe. I managed to get these on sale after the holidays, but I think they would be nice any time of year.
Feliz Navidad is a pale pink/cream coloured polish with a gold shimmer, pink glitter, tiny gold hex glitter, and small pink hex glitter. I'm starting to really love neutrals and nudes, and this one in particular is quite beautiful. It's very feminine and delicate. The formula was great, it went on smooth and I only needed two coats for full coverage.
 |
| Happy Hands Feliz Navidad |
 |
| Happy Hands Feliz Navidad |
Silent Night is a blue jelly that leans towards teal. It's packed with different sizes and shapes of sky blue glitter. It's super sparkly and shimmery, also it's very vibrant in colour. The formula was perfect and I used three coats here, although you may be able to get away with two. A bonus about this polish - the glitter seems to have a duochrome effect where it looks green in some lights. It's absolutely stunning!
 |
| Happy Hands Silent Night |
 |
| Happy Hands Silent Night |
I really loved both of these polishes, and plan to add more Happy Hands polish to my collection. One thing to note about both of these is that they have a strong smell. I believe it is caused by the pigments used to make the polish. It goes away after your nails dry, but I feel it should be noted.
What do you think of these? Do you own, or want to own any Happy Hands polishes?
03 January 2013
Girly Bits Season of Sparkle: My Picks, Part 2
Hi everyone! As promised this is the second part of my swatches for the Girly Bits Season of Sparkle holiday collection. Don't forget to check out the two glitter toppers that I showed in part one. As explained previously, I only bought five polishes out of this collection. That's not to say that I didn't like the other four (there are 9 in total), it's just that my wallet was not going to approve of me buying the entire collection. If you want to see what all nine polishes look like, please check out the Girly Bits website/blog here.
Today I'm showing three polishes that can be worn on their own - Eggnogoholic, Long Winter's Nap, and Visions of Sugar Plums. These are absolutely beautiful, so I'm just going to jump right into my description of each. The formula on all three is very similar, so I'll discuss that at the end.
Eggnogoholic: This is a sheer creamy white polish with tiny gold square and hex glitter. I love this one, and I'm not surprised that it has been one of the bestsellers of the collection (it's sold out at a number of places that are carrying this collection). This polish has a delicate, almost ethereal, quality that is appealing. I also like the slightly off-white base. I see many white with glitter indie polishes, but not too many with an off-white/cream coloured base, and I find that the colour of this polish is very flattering on my skin tone.
Long Winter's Nap: If you follow this blog long enough, you'll know that I love blue polishes, and especially blue-grey polishes. This one is no exception! It's a mid-toned blue-grey with a nice mixture of glitter: different sizes of periwinkle hexes, small blue hexes, and two sizes of silver hex glitter. However, it wasn't until I was wearing this polish and it hit the light that I noticed a lavender opalescent shimmer to it as well. On close inspection it looks like there's some sheer opalescent glitter that is subtle but adds depth to the polish. If there was such thing as comfort polish (you know like comfort food) this would be it for me!
Visions of Sugar Plums: This is a plum jelly with a pretty complex mix of glitter. I loved this one the moment I saw it on the Girly Bits blog, but I had no idea of the intensity and luminosity of this polish until I saw it in person. In this case the term "lit from within," used to describe polishes that have a shimmer that seems to glow, is an understatement. The glitter is comprised of what looks like copper squares, small silver hexes, teeny blue and pink hexes, and the same type of opalescent glitter seen in Long Winter's Nap. The glitter complements the plum base perfectly, and it comes alive when it hits the light. You can see that especially in the bottle that I'm holding in the photos. I love that this polish captures the magic of the poem that the name derives from (Twas the Night Before Christmas), yet I could wear this any time of year.
Formula: The formula on all three was excellent. I used three thin coats for all three polishes. Like many indie polishes they tend to get a bit thick when you are using them. But I find if I shake it before applying that helps to keep the consistency just right. That also ensures you get enough glitter on the brush. But I find with these polishes that you don't have the issue of all the glitter sinking to the bottom like you do with some glitter polishes.
For me, all three of these polishes are must haves. In fact the entire holiday collection is impressive, and the five that I bought are probably my favourite Girly Bits polishes that I own (and I own quite a few). What I love most about the polishes I've shown yesterday and today is that although they are holiday polishes, they really can be worn year round. If you are interested in getting any of these, your best bet might be the Girly Bits online store, which is set to reopen tomorrow morning. Especially if you want to get your hands on Eggnogoholic.
What do you think of these? Do any stand out for you?
Today I'm showing three polishes that can be worn on their own - Eggnogoholic, Long Winter's Nap, and Visions of Sugar Plums. These are absolutely beautiful, so I'm just going to jump right into my description of each. The formula on all three is very similar, so I'll discuss that at the end.
Eggnogoholic: This is a sheer creamy white polish with tiny gold square and hex glitter. I love this one, and I'm not surprised that it has been one of the bestsellers of the collection (it's sold out at a number of places that are carrying this collection). This polish has a delicate, almost ethereal, quality that is appealing. I also like the slightly off-white base. I see many white with glitter indie polishes, but not too many with an off-white/cream coloured base, and I find that the colour of this polish is very flattering on my skin tone.
 |
| Girly Bits Eggnogoholic |
 |
| Girly Bits Eggnogoholic |
Long Winter's Nap: If you follow this blog long enough, you'll know that I love blue polishes, and especially blue-grey polishes. This one is no exception! It's a mid-toned blue-grey with a nice mixture of glitter: different sizes of periwinkle hexes, small blue hexes, and two sizes of silver hex glitter. However, it wasn't until I was wearing this polish and it hit the light that I noticed a lavender opalescent shimmer to it as well. On close inspection it looks like there's some sheer opalescent glitter that is subtle but adds depth to the polish. If there was such thing as comfort polish (you know like comfort food) this would be it for me!
 |
| Girly Bits Long Winter's Nap |
 |
| Girly Bits Long Winter's Nap |
Visions of Sugar Plums: This is a plum jelly with a pretty complex mix of glitter. I loved this one the moment I saw it on the Girly Bits blog, but I had no idea of the intensity and luminosity of this polish until I saw it in person. In this case the term "lit from within," used to describe polishes that have a shimmer that seems to glow, is an understatement. The glitter is comprised of what looks like copper squares, small silver hexes, teeny blue and pink hexes, and the same type of opalescent glitter seen in Long Winter's Nap. The glitter complements the plum base perfectly, and it comes alive when it hits the light. You can see that especially in the bottle that I'm holding in the photos. I love that this polish captures the magic of the poem that the name derives from (Twas the Night Before Christmas), yet I could wear this any time of year.
 |
| Girly Bits Visions of Sugar Plums |
 |
| Girly Bits Visions of Sugar Plums |
Formula: The formula on all three was excellent. I used three thin coats for all three polishes. Like many indie polishes they tend to get a bit thick when you are using them. But I find if I shake it before applying that helps to keep the consistency just right. That also ensures you get enough glitter on the brush. But I find with these polishes that you don't have the issue of all the glitter sinking to the bottom like you do with some glitter polishes.
For me, all three of these polishes are must haves. In fact the entire holiday collection is impressive, and the five that I bought are probably my favourite Girly Bits polishes that I own (and I own quite a few). What I love most about the polishes I've shown yesterday and today is that although they are holiday polishes, they really can be worn year round. If you are interested in getting any of these, your best bet might be the Girly Bits online store, which is set to reopen tomorrow morning. Especially if you want to get your hands on Eggnogoholic.
What do you think of these? Do any stand out for you?
31 December 2012
Simple New Year's Eve "Champagne Bubbles" Mani
Happy New Year's Eve everyone! Or New Year's Day depending on where you are. I'm going to be having a quiet night in, because that's just how I am, but I wanted to try and do a special mani for tonight.
Before I get into it, I just wanted to take a moment to thank you for following and reading my blog. Sometimes I question this hobby of mine - I've been spending too much money on nail polish, this blog takes away time from my dissertation, and I could go on. But it's also helped me get through some rough times recently, in particular a break up with my boyfriend in the fall, and just general lack of satisfaction with my work and PhD. I don't know where this hobby is going, but I've been really happy with the work I've been doing lately and my initial forays into nail art. I hope to do more good work - both swatches and nail art - and I'm looking forward to sharing it on this blog.
With that I should say that this mani came out of a failed attempt, or more exactly, a change of plans. For a New Year's Eve design, I wanted to do something simple that evokes celebration, but without being literal. So my idea was to do freehand champagne bubbles. Only my freehand circles were looking like leopard spots (yikes!) so I went for the dotting tools to cover my mistakes and salvage this mani. So here you have my first time using dotting tools!
I used Essie Midnight Cami, a deep vibrant midnight blue, for the base, and for the gold I used Stripe Rite polish in gold. I used different sized dotting tools to get the different sizes of dots. The result is very simple, and while I wasn't too sure about it at first, it is starting to grow on me. I love the dark blue/gold colour combination, and I also love the simplicity of this. If I was going out, knowing me I'd be rushing to get ready, so a simple mani like this would be my choice.
What do you think? Do you like dot manicures?
Before I get into it, I just wanted to take a moment to thank you for following and reading my blog. Sometimes I question this hobby of mine - I've been spending too much money on nail polish, this blog takes away time from my dissertation, and I could go on. But it's also helped me get through some rough times recently, in particular a break up with my boyfriend in the fall, and just general lack of satisfaction with my work and PhD. I don't know where this hobby is going, but I've been really happy with the work I've been doing lately and my initial forays into nail art. I hope to do more good work - both swatches and nail art - and I'm looking forward to sharing it on this blog.
 |
| "Champagne Bubbles" dot manicure |
With that I should say that this mani came out of a failed attempt, or more exactly, a change of plans. For a New Year's Eve design, I wanted to do something simple that evokes celebration, but without being literal. So my idea was to do freehand champagne bubbles. Only my freehand circles were looking like leopard spots (yikes!) so I went for the dotting tools to cover my mistakes and salvage this mani. So here you have my first time using dotting tools!
 |
| "Champagne Bubbles" dot manicure |
I used Essie Midnight Cami, a deep vibrant midnight blue, for the base, and for the gold I used Stripe Rite polish in gold. I used different sized dotting tools to get the different sizes of dots. The result is very simple, and while I wasn't too sure about it at first, it is starting to grow on me. I love the dark blue/gold colour combination, and I also love the simplicity of this. If I was going out, knowing me I'd be rushing to get ready, so a simple mani like this would be my choice.
 |
| "Champagne Bubbles" dot manicure |
What do you think? Do you like dot manicures?
25 December 2012
Advent Calendar Nail Challenge, Day 19: Ugly Sweater
To those of you who celebrate Christmas, Merry Christmas! And those of you who don't, I hope you are enjoying the time off to relax and/or be with family. I'm here at the very last minute trying to sneak in another post for the Advent Calendar Nail Challenge, and as usual, I'm late! ;)
But first I wanted to welcome and thank my new followers. And thanks especially to those of you who shared my blog with others (Pam of Girly Bits, Nailderella, and The Little Canvas, I'm looking at you!). Since I posted my stained glass Nativity nails two days ago, I've received an overwhelming amount of support and recognition, mostly on Instagram but also other sites and platforms as well. I won a challenge on Instagram hosted by WAH Nails, based in London, UK, which ended up generating a lot of traffic to my Instagram and also this blog. I'm really happy and excited by all of this. First and foremost though, I blog for myself because I enjoy it. But it's also nice when people notice what you are doing.
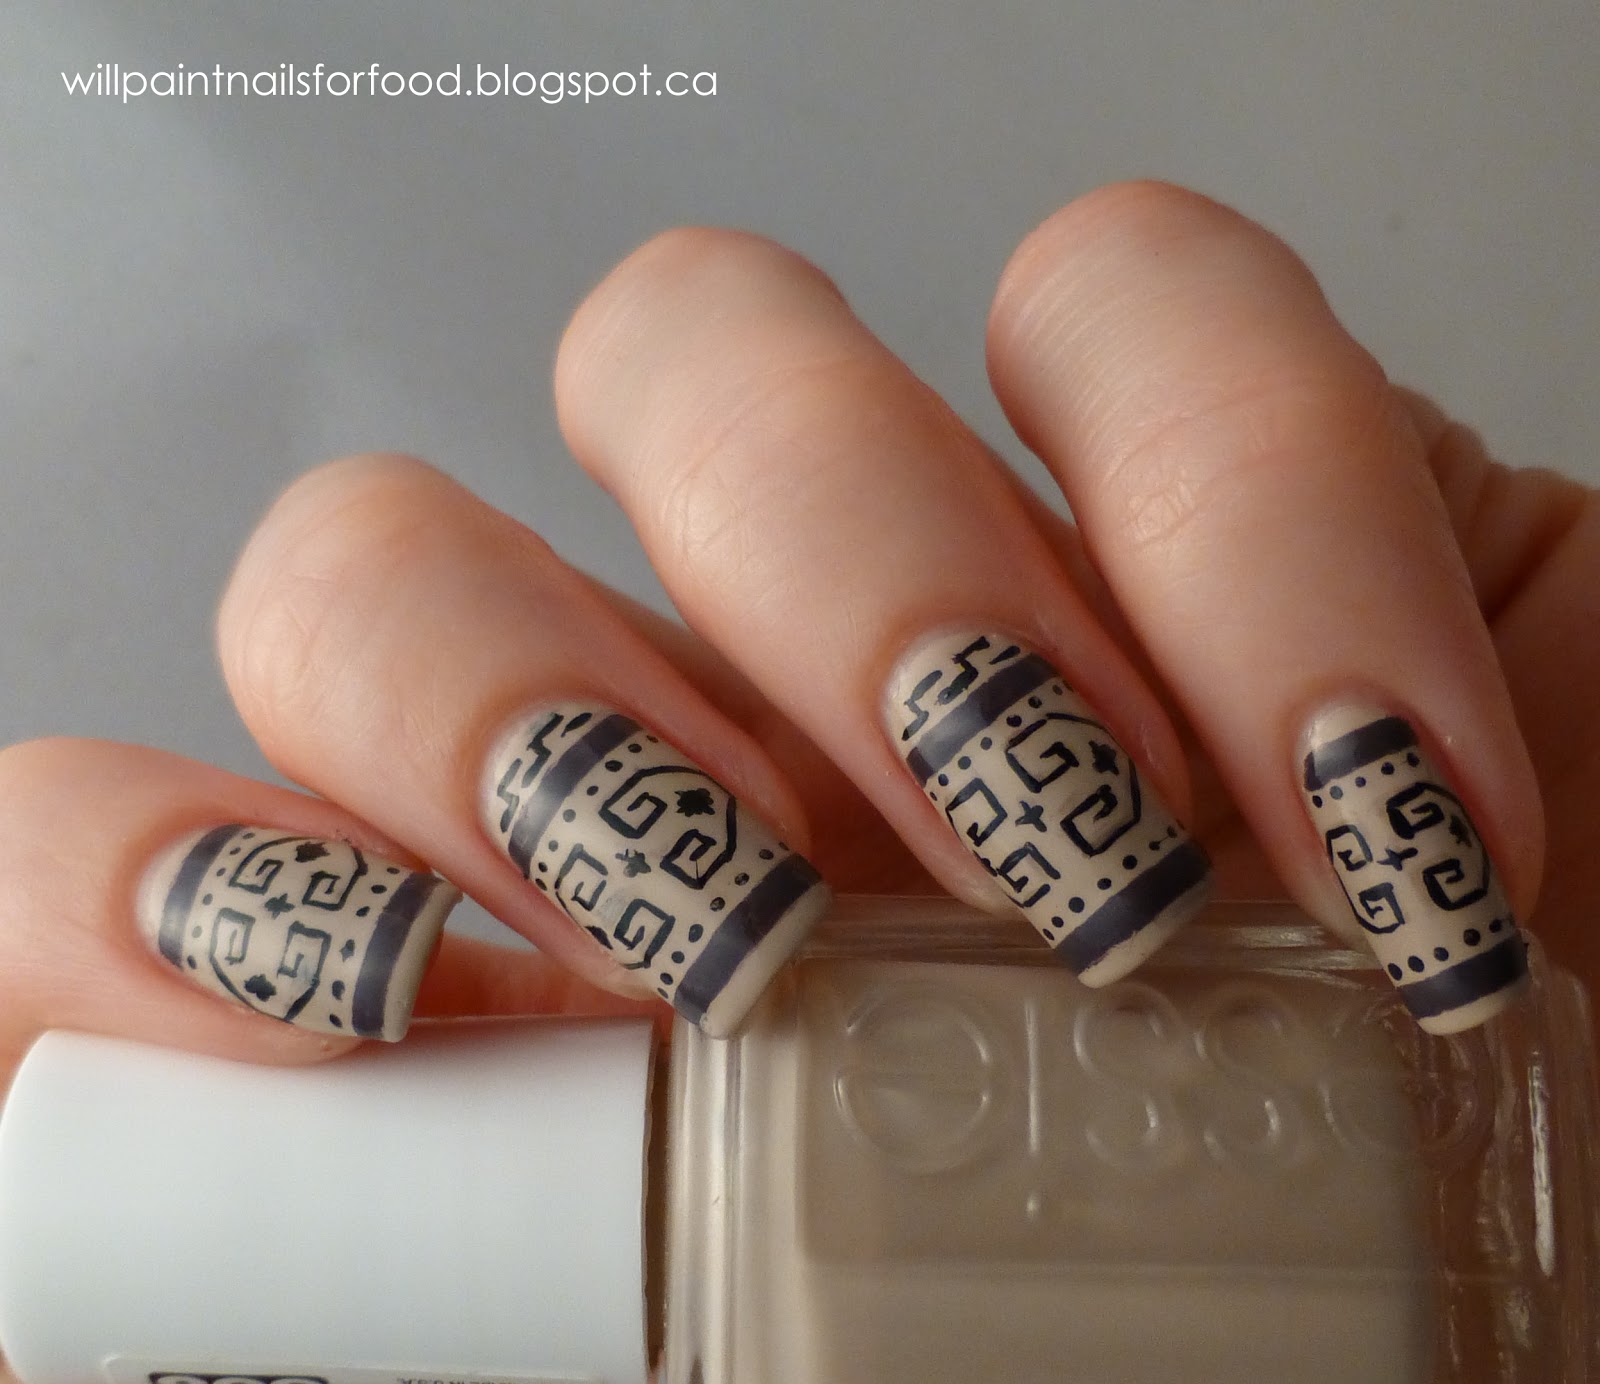
But onto my nail design! The theme I chose to do was "ugly sweater" and my inspiration for this design is the sweater worn by Jeff Bridges AKA "The Dude" in the Big Lebowski. I love this movie! Did you know that there's been quite a bit of scholarly research done on this movie? Maybe I'm getting my PhD in the wrong area, haha!
If you need a refresher, here's "The Dude" and his sweater. Not the best view, but it will do.
The entire design was done freehand, using teeny tiny brushes and a lot of patience. I started with two coats of Essie Sand Tropez. Then I painted the bars along the top and bottom with Sally Hansen Grey Area. I finished with Stripe Rite in Black for the dots and the intricate design in the middle.
It's not perfect and I can see the mistakes, but I've come a long way. My first time using nail art brushes was a few weeks ago when I did my ornament nails for this advent challenge. I remind myself of this when I get down on myself because things aren't perfect. Ah, the joys of being a perfectionist!
Thanks for reading!
 |
| Ugly sweater nails |
But first I wanted to welcome and thank my new followers. And thanks especially to those of you who shared my blog with others (Pam of Girly Bits, Nailderella, and The Little Canvas, I'm looking at you!). Since I posted my stained glass Nativity nails two days ago, I've received an overwhelming amount of support and recognition, mostly on Instagram but also other sites and platforms as well. I won a challenge on Instagram hosted by WAH Nails, based in London, UK, which ended up generating a lot of traffic to my Instagram and also this blog. I'm really happy and excited by all of this. First and foremost though, I blog for myself because I enjoy it. But it's also nice when people notice what you are doing.
 |
| Ugly sweater nails |
But onto my nail design! The theme I chose to do was "ugly sweater" and my inspiration for this design is the sweater worn by Jeff Bridges AKA "The Dude" in the Big Lebowski. I love this movie! Did you know that there's been quite a bit of scholarly research done on this movie? Maybe I'm getting my PhD in the wrong area, haha!
If you need a refresher, here's "The Dude" and his sweater. Not the best view, but it will do.
 |
| "The Dude", The Big Lebowski (source) |
The entire design was done freehand, using teeny tiny brushes and a lot of patience. I started with two coats of Essie Sand Tropez. Then I painted the bars along the top and bottom with Sally Hansen Grey Area. I finished with Stripe Rite in Black for the dots and the intricate design in the middle.
 |
| Ugly sweater nails |
It's not perfect and I can see the mistakes, but I've come a long way. My first time using nail art brushes was a few weeks ago when I did my ornament nails for this advent challenge. I remind myself of this when I get down on myself because things aren't perfect. Ah, the joys of being a perfectionist!
Thanks for reading!
23 December 2012
Advent Calendar Nail Challenge, Day 16: Inspired by a Christmas Song
Hi everyone! I'm really excited about what I came up with for today's post, but I should also warn you that this post is a bit picture heavy! The theme I chose to do for today is "inspired by a Christmas song," and I'll admit that at first I was really at a loss for what to do. I'm not really into many Christmas songs, but I decided to take the song Silent Night as my inspiration. It is one of the few Christmas songs that I like.
When I was a child, I remember Christmas Eve being a very special time. Several years we went to midnight mass at church (I'm Roman Catholic), and afterwards my sister and I would get to stay up late and open one Christmas present early. Talk about serious anticipation! Knowing that you had to wait another several hours until morning before you got to open the rest of your presents. Sometimes I miss those moments. The holidays really change when you grow up.
But back to the nails. Taking the theme of Silent Night - the Nativity - I decided to depict it in the style of stained glass. I really love stained glass, and especially stained glass in churches! So from left to right I painted the manger, Mary and Joseph with baby Jesus, the Star of Bethlehem, and the Chi Rho symbol.
Here's the list of colours that I used:
Sephora by OPI, Living in Cin-namon (for the brown areas)
Essence A Piece of Forever (gold)
Nicole by OPI, Pretty in Plum (for the purple areas)
piCture pOlish Cosmos (blue)
Enchanted Polish Bruised Nutcracker (blue)
piCture pOlish Kryptonite (green)
Zoya Blaze (red)
Essie Sand Tropez (for flesh tones)
Sally Hansen White On (for star and Chi Rho)
Stripe Rite Black (for all outlines)
I won't go into details about process because it's pretty simple. Basically I painted in all the colours and then went over everything with the Stripe Rite black. But while it wasn't complex in terms of process, it was very time consuming. I worked slow so that I could get the details right. In total, I think I spent about three hours on this mani.
Some of these pictures are taken without a topcoat. I like this because you don't get the reflection in the photos. Others were taken with a top coat - Seche Vite. Overall I love how this mani turned out. Because I used a lot of shimmery colours, it's even more glittery and sparkly in person. It really does look like I have little stained glass nails.
What do you think?
 |
| Nativity stained glass nails |
 |
| Nativity stained glass nails |
When I was a child, I remember Christmas Eve being a very special time. Several years we went to midnight mass at church (I'm Roman Catholic), and afterwards my sister and I would get to stay up late and open one Christmas present early. Talk about serious anticipation! Knowing that you had to wait another several hours until morning before you got to open the rest of your presents. Sometimes I miss those moments. The holidays really change when you grow up.
But back to the nails. Taking the theme of Silent Night - the Nativity - I decided to depict it in the style of stained glass. I really love stained glass, and especially stained glass in churches! So from left to right I painted the manger, Mary and Joseph with baby Jesus, the Star of Bethlehem, and the Chi Rho symbol.
 |
| Nativity stained glass nails |
Here's the list of colours that I used:
Sephora by OPI, Living in Cin-namon (for the brown areas)
Essence A Piece of Forever (gold)
Nicole by OPI, Pretty in Plum (for the purple areas)
piCture pOlish Cosmos (blue)
Enchanted Polish Bruised Nutcracker (blue)
piCture pOlish Kryptonite (green)
Zoya Blaze (red)
Essie Sand Tropez (for flesh tones)
Sally Hansen White On (for star and Chi Rho)
Stripe Rite Black (for all outlines)
 |
| Nativity stained glass nails |
I won't go into details about process because it's pretty simple. Basically I painted in all the colours and then went over everything with the Stripe Rite black. But while it wasn't complex in terms of process, it was very time consuming. I worked slow so that I could get the details right. In total, I think I spent about three hours on this mani.
 |
| Nativity stained glass nails (with top coat) |
Some of these pictures are taken without a topcoat. I like this because you don't get the reflection in the photos. Others were taken with a top coat - Seche Vite. Overall I love how this mani turned out. Because I used a lot of shimmery colours, it's even more glittery and sparkly in person. It really does look like I have little stained glass nails.
What do you think?
13 December 2012
Advent Calendar Nail Challenge, Day 13: Snow!
Hi everyone! Sorry for my disappearance yesterday. I tried to do something for yesterday's challenge, which was family, but my idea didn't turn out so well. I feel torn as to whether I should show and blog about my mistakes, or whether I should only show stuff I feel 100% confident about. I may try to redo it, but for now, I'm moving on with the challenge.
Today's challenge deals with something that we have yet to see here in Toronto this winter...snow!! Despite the fact that we're less than two weeks away from Christmas, I have yet to see any snow, except maybe briefly one evening about a week ago. And since this is Canada, we have a bit of a reputation to uphold. ;)
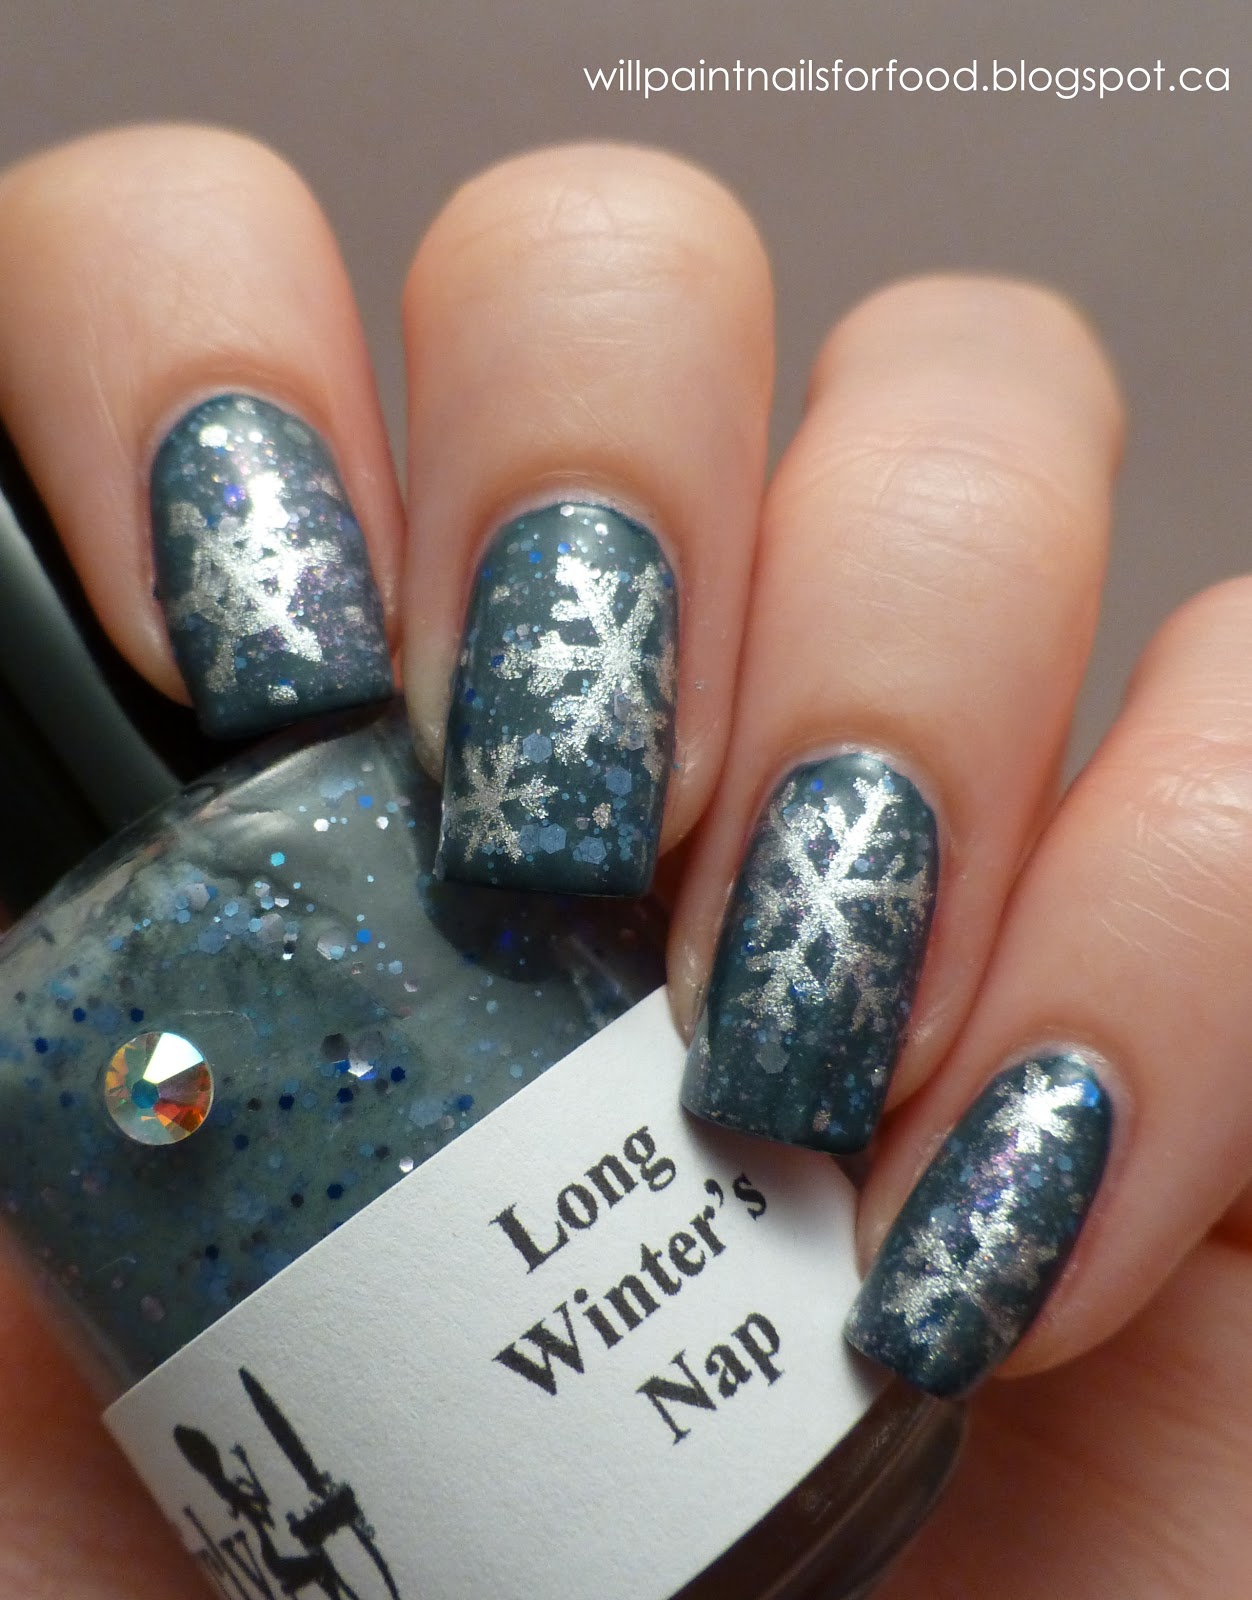
I see a lot of snowflake manis that use white on pale blue backgrounds, but I decided to be a bit different and do silver on a darker blue background. I also knew that I wanted to layer several polishes in order to have a more complex snowflake mani.
Here's the polishes that I used:
Avon Stunning Cobalt
Girly Bits Long Winter's Nap
Joe Fresh Opal
It's So Easy Stripe Rite in Silver
I started with two coats of Stunning Cobalt, a dark navy with a blue shimmer. I don't think the shimmer is really visible, so any dark navy blue would work. I then layered one coat of Long Winter's Nap. At this point I had a dark blue grey, with a nice mixture of silver and blue glitter. I sponged on a bit of Opal, which gives the nails a nice purple shimmer. It's really only visible when it catches the light, but it adds a nice touch. I finished by drawing on the snowflakes freehand using the Stripe Rite polish, but I used a small watercolour brush (size 5/0). I have a hard time trying to control the striping brush that comes with the polish, so that's why I like to use a small detail brush.
I really love how this turned out. There's a lot going on and it holds my interest. I find myself looking at the different pieces of glitter and how they interact with the shimmer and snowflakes. It makes me think of snowflakes in the night sky. What do you think? Have you done a snowflake mani this winter?
Today's challenge deals with something that we have yet to see here in Toronto this winter...snow!! Despite the fact that we're less than two weeks away from Christmas, I have yet to see any snow, except maybe briefly one evening about a week ago. And since this is Canada, we have a bit of a reputation to uphold. ;)
 |
| Snowflake nails |
I see a lot of snowflake manis that use white on pale blue backgrounds, but I decided to be a bit different and do silver on a darker blue background. I also knew that I wanted to layer several polishes in order to have a more complex snowflake mani.
 |
| Snowflake nails |
Here's the polishes that I used:
Avon Stunning Cobalt
Girly Bits Long Winter's Nap
Joe Fresh Opal
It's So Easy Stripe Rite in Silver
 |
| Snowflake nails: (L-R) Girly Bits Long Winter's Nap, Stripe Rite in Silver (foil), Joe Fresh Opal, Avon Stunning Cobalt |
I started with two coats of Stunning Cobalt, a dark navy with a blue shimmer. I don't think the shimmer is really visible, so any dark navy blue would work. I then layered one coat of Long Winter's Nap. At this point I had a dark blue grey, with a nice mixture of silver and blue glitter. I sponged on a bit of Opal, which gives the nails a nice purple shimmer. It's really only visible when it catches the light, but it adds a nice touch. I finished by drawing on the snowflakes freehand using the Stripe Rite polish, but I used a small watercolour brush (size 5/0). I have a hard time trying to control the striping brush that comes with the polish, so that's why I like to use a small detail brush.
 |
| Snowflake nails |
I really love how this turned out. There's a lot going on and it holds my interest. I find myself looking at the different pieces of glitter and how they interact with the shimmer and snowflakes. It makes me think of snowflakes in the night sky. What do you think? Have you done a snowflake mani this winter?
 |
| Snowflake nails |
12 December 2012
Advent Calendar Nail Challenge, Day 11: Gifts
Hi everyone! I realize that with this challenge I've been posting later and later in the day. For the past couple of days I've been doing my nail art in the evening, followed by photographing, editing, and then writing my blog post. By doing this, I'm trying to not let the nail art and the challenge in general encroach on my work time (I work from home so it's easy for that to happen). But tonight I'm later than usual because I went out for drinks with a friend. But this also means that I'm getting to sleep later, and waking up later, and on and on.
What I am really trying to say is that I need to figure out a blogging schedule. I feel like I have not been able to focus as much on work because of this late night madness.
So for the sake of time, I did a really simple mani for today's challenge. I was inspired by this mani I saw on Goose's Glitter. I also wanted to wear my new Illamasqua Viridian / Glitterati duo, but not have the nail art overshadow these beautiful polishes.
I did the bow with Orly Luxe and a small detail brush. My freehand skills are getting a tad better, but I still feel uncertain and shaky handed when I am working with the brush.
I absolutely love these Illamasqua polishes and I'm hoping to do a proper review of them soon. They certainly deserve more time than I can give them tonight. For now, I hope you enjoy the photos. :)
 |
| Holiday gifts mani |
What I am really trying to say is that I need to figure out a blogging schedule. I feel like I have not been able to focus as much on work because of this late night madness.
 |
| Holiday gifts mani |
So for the sake of time, I did a really simple mani for today's challenge. I was inspired by this mani I saw on Goose's Glitter. I also wanted to wear my new Illamasqua Viridian / Glitterati duo, but not have the nail art overshadow these beautiful polishes.
 |
| Holiday gifts mani |
I did the bow with Orly Luxe and a small detail brush. My freehand skills are getting a tad better, but I still feel uncertain and shaky handed when I am working with the brush.
 |
| Holiday gifts mani |
I absolutely love these Illamasqua polishes and I'm hoping to do a proper review of them soon. They certainly deserve more time than I can give them tonight. For now, I hope you enjoy the photos. :)