 |
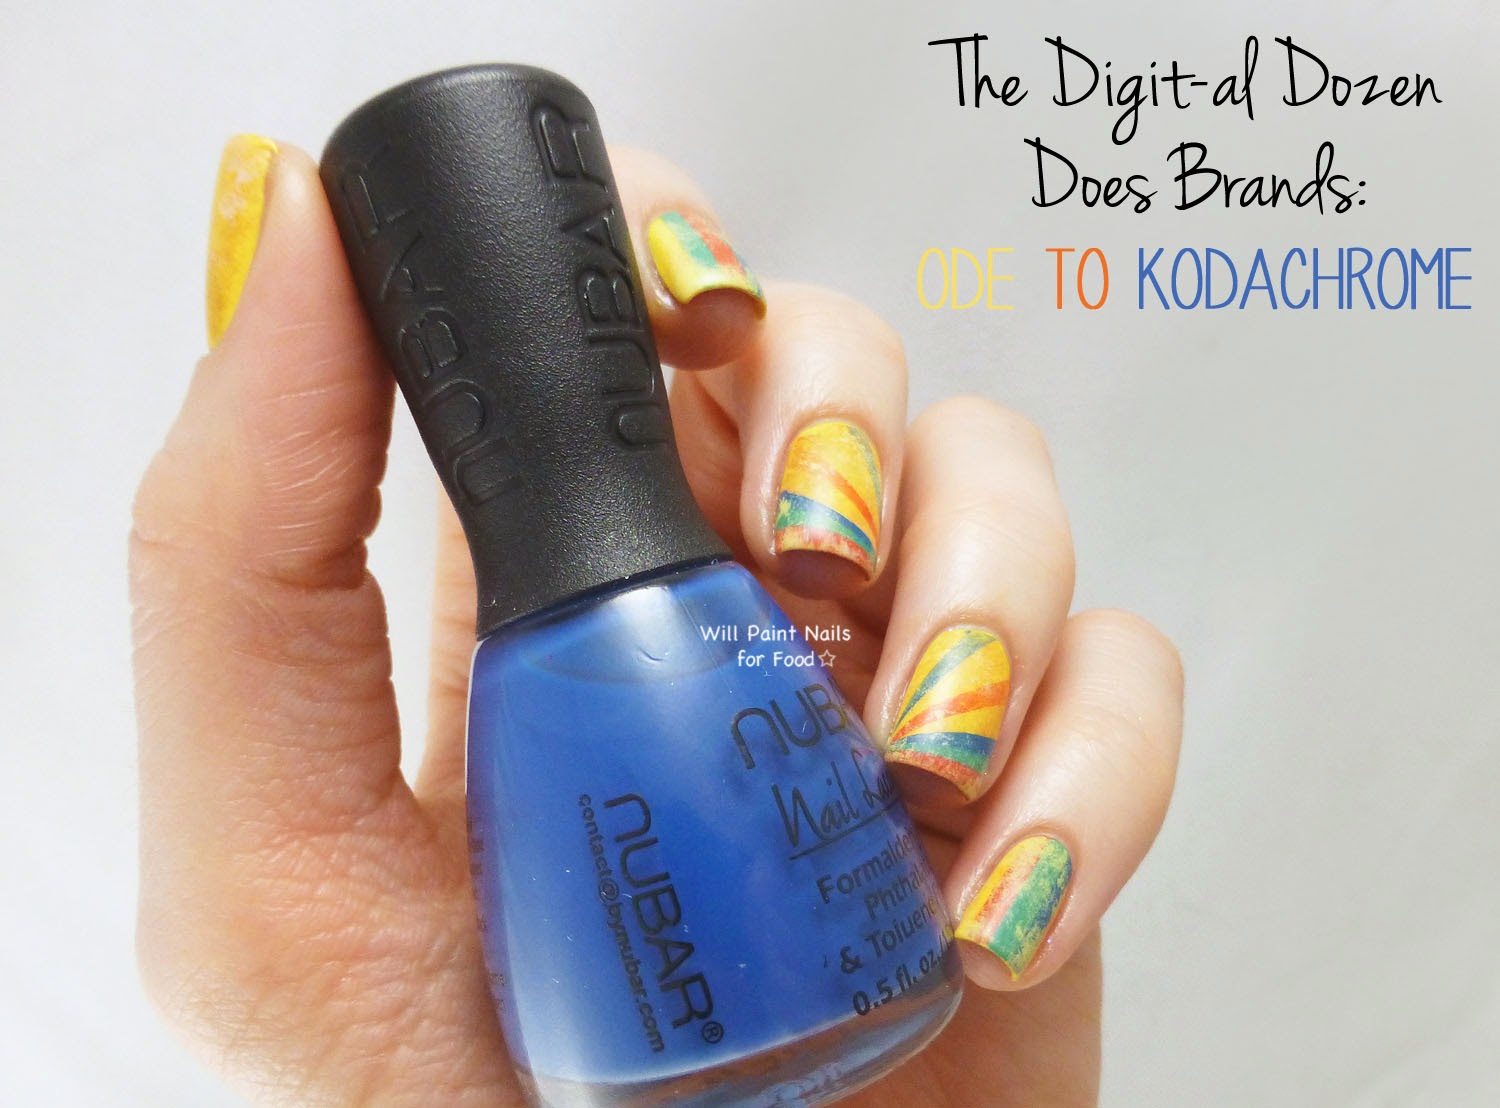
| Ode to Kodachrome |

Showing posts with label Nubar. Show all posts
Showing posts with label Nubar. Show all posts
13 March 2014
The Digit-al Dozen Does Brands, Day Two: Ode To Kodachrome
Hi everyone! I'm now a day behind with the Digit-al Dozen challenge, which means I'll either try to catch up during the week, or on the weekend. Today's design is inspired by Kodak, and its most iconic film, Kodachrome. One thing you probably don't know about me is that I have a love of film photography. I don't get a chance to practice much, and it's not something I excel at, but I have several film cameras, including a few older ones and a Lomography camera.
27 October 2013
31 Day Challenge: Day Twenty-Eight, Inspired by a Flag: The Franco-Ontarian Flag
Hi everyone! Out of all the prompts in the 31 Day Challenge, the "Inspired by a Flag" prompt is by far the most uninspiring of all of them. I realize that flags serve an important purpose as symbols of nations, regions or groups, and I find it interesting to see what flags different countries and regions adopt. But on an aesthetic level, flags are pretty boring and unappealing. Like, someone please, take a brush and paint some pretty flowers on that thing! But it's a challenge, and in my research I ended up finding a flag that was interesting on a more personal level.
 |
| Franco-Ontarian flag nail art |
28 September 2013
31 Day Challenge: Day Twenty-Three, Inspired By A Movie: Eternal Sunshine of the Spotless Mind
Hi everyone! It looks like both Lindsey and I are late again on this challenge. Suffice it to say that our posting schedule is now Tuesday or Wednesday and Friday or Saturday. I feel like we've come so far on this challenge that I'm actually starting to feel sad that it will soon be over - then I realize we have another month because of our two day a week schedule!
About this design: I had two criteria for the movie for today's challenge: first, it had to be something that I could easily translate to nail art. Many movies have amazing imagery and effects, but much of it is too difficult to make into nail art. And second, it had to be available on Netflix, because I actually wanted to see the movie while I was doing my nails.
I had seen Eternal Sunshine of the Spotless Mind several years ago, and for some reason it popped into my mind. If you are familiar with the movie, then you will know I took the design from the cover image. My thumb nail is an abstract representation of Clementine's hair, which changes colours throughout the movie, from green, to red, to orange, to blue. It's a bit disjointed from the rest of the design, but I felt it needed something else.
To get this look: I started with a base of OPI My Boyfriend Scales Walls. Using a tiny piece of makeup sponge I dabbed on a mixture of blues and greys until I had a nice background that went from dark to light. For that step I used Misa Blueberry Blast (pale blue), Girly Bits Elephant Shoe (grey creme), My Boyfriend Scales Walls (white), and Essie Smooth Sailing (mid-value greyish blue). My index and pinky fingers were topped with China Glaze Fairy Dust.
I painted the ice break with white polish and Smooth Sailing to define it. The figures were painted freehand with black polish thinned with nail polish thinner. For the colours on the thumb I used Nubar Resort Yellow, Forbidden Fruit (orange), On The Radar (red), My New Obsession, and Into the Wild (green). The yellow and orange I mixed together to make a brighter orange, the other colours I used straight.
Overall, I like how it turned out, despite the more literal representation. However, if I were to do it again, I'd take out the figures and make it much more abstract dealing with the idea of fractured memories. After watching the film again, that was one of the themes that really stood out for me.
What do you think of this? How would you do the "inspired by a movie" prompt?
---
 |
| Eternal Sunshine of the Spotless Mind inspired nail art |
About this design: I had two criteria for the movie for today's challenge: first, it had to be something that I could easily translate to nail art. Many movies have amazing imagery and effects, but much of it is too difficult to make into nail art. And second, it had to be available on Netflix, because I actually wanted to see the movie while I was doing my nails.
I had seen Eternal Sunshine of the Spotless Mind several years ago, and for some reason it popped into my mind. If you are familiar with the movie, then you will know I took the design from the cover image. My thumb nail is an abstract representation of Clementine's hair, which changes colours throughout the movie, from green, to red, to orange, to blue. It's a bit disjointed from the rest of the design, but I felt it needed something else.
 |
| Eternal Sunshine of the Spotless Mind inspired nail art |
To get this look: I started with a base of OPI My Boyfriend Scales Walls. Using a tiny piece of makeup sponge I dabbed on a mixture of blues and greys until I had a nice background that went from dark to light. For that step I used Misa Blueberry Blast (pale blue), Girly Bits Elephant Shoe (grey creme), My Boyfriend Scales Walls (white), and Essie Smooth Sailing (mid-value greyish blue). My index and pinky fingers were topped with China Glaze Fairy Dust.
 |
| Thumb design inspired by Clementine's hair |
I painted the ice break with white polish and Smooth Sailing to define it. The figures were painted freehand with black polish thinned with nail polish thinner. For the colours on the thumb I used Nubar Resort Yellow, Forbidden Fruit (orange), On The Radar (red), My New Obsession, and Into the Wild (green). The yellow and orange I mixed together to make a brighter orange, the other colours I used straight.
 |
| Eternal Sunshine of the Spotless Mind inspired nail art |
Overall, I like how it turned out, despite the more literal representation. However, if I were to do it again, I'd take out the figures and make it much more abstract dealing with the idea of fractured memories. After watching the film again, that was one of the themes that really stood out for me.
What do you think of this? How would you do the "inspired by a movie" prompt?
---
20 July 2013
31 Day Challenge: Day Three, Yellow: Cone Flowers
Hi everyone! Thank goodness it's Friday, right!? Unless you're a grad student on summer break, then everyday is like Friday, so it's no big deal, Lol! I've actually been nail art-ing all day, which sounds like fun, except for the extreme heat - I swear it's like 5 degrees warmer in my place than outside!
About this design: I knew for today's challenge that I wanted to do cone flowers. There's just no ands, ifs, or buts about it! I love cone flowers because they look like wilted daisies, and I don't think I could ever get tired drawing or painting them.
To get this look: I started with a base of white, then when that was dry, used a few neon colours and did a watercolour mani. This served as my background. Then using a yellow polish I sketched out the flowers, then painted in the petals. I built up the flowers until they were opaque, and added a lighter yellow for highlights. I painted in the centre head-thing of the flower using a mixture of brown and yellow. Finally I added some shadows at the base of the head where it meets the petals. Everything was topped off with KBShimmer Clearly On Top.
Polished used:
Sally Hansen White On: base
China Glaze You Drive Me Coconuts: used in watercolour background
China Glaze Isle See You Later: used in watercolour background
China Glaze That's Shore Bright: used in watercolour background
China Glaze Neon & On & On: used in watercolour background
Sally Hansen Lightening: Yellow, used as base colour for flowers
Nubar Resort Yellow: Light yellow, highlights for flowers
OPI You Don't Know Jacques: Brown, mixed with yellow for flowers
L'Oreal New Money: Lime green, used for flower stems
I was trying to practice the kind of freehand painting that you saw with my poppies from day one of the challenge. Only this time I wanted to make it even looser and a bit more abstract. I think they turned out well, although I wish the flowers stood out more - for that I'd need a darker background.
Make sure you check out Lindsey's nails for day three over at Wondrously Polished!
What do you think of this?
---
About this design: I knew for today's challenge that I wanted to do cone flowers. There's just no ands, ifs, or buts about it! I love cone flowers because they look like wilted daisies, and I don't think I could ever get tired drawing or painting them.
 |
| Cone Flowers Nail Art |
To get this look: I started with a base of white, then when that was dry, used a few neon colours and did a watercolour mani. This served as my background. Then using a yellow polish I sketched out the flowers, then painted in the petals. I built up the flowers until they were opaque, and added a lighter yellow for highlights. I painted in the centre head-thing of the flower using a mixture of brown and yellow. Finally I added some shadows at the base of the head where it meets the petals. Everything was topped off with KBShimmer Clearly On Top.
 |
| Cone Flowers Nail Art |
Polished used:
Sally Hansen White On: base
China Glaze You Drive Me Coconuts: used in watercolour background
China Glaze Isle See You Later: used in watercolour background
China Glaze That's Shore Bright: used in watercolour background
China Glaze Neon & On & On: used in watercolour background
Sally Hansen Lightening: Yellow, used as base colour for flowers
Nubar Resort Yellow: Light yellow, highlights for flowers
OPI You Don't Know Jacques: Brown, mixed with yellow for flowers
L'Oreal New Money: Lime green, used for flower stems
 |
| Cone Flowers Nail Art |
 |
| Cone Flowers Nail Art |
I was trying to practice the kind of freehand painting that you saw with my poppies from day one of the challenge. Only this time I wanted to make it even looser and a bit more abstract. I think they turned out well, although I wish the flowers stood out more - for that I'd need a darker background.
Make sure you check out Lindsey's nails for day three over at Wondrously Polished!
What do you think of this?
---
12 July 2013
31 Day Challenge: Day One, Red: Freehand Poppies
Hi everyone! Today I'll be starting the 31 Day Challenge along with Lindsey of Wondrously Polished. I'm very excited because I've heard that the 31 Day Challenge is a good way to improve your nail art skills, also I love Lindsey's nail art, so she's the perfect partner in crime! We won't be doing it everyday, instead we're on a two day a week schedule, which will be Tuesdays and Fridays for now. Make sure you check out Lindsey's blog for her design.
About this design: Day one is red, and I originally planned some gradient/tape/stud skittle mani, but at the last minute changed my mind to do some flowers instead. Here I've done some red poppies, made to look like they are in some field. The original inspiration was the watercolours of Emile Nolde, or some vague memory I had of his watercolour paintings of flowers. But I was also thinking of a nail art design I did over the holidays, coniferous trees in the winter done in a painterly style. So I really liked the idea of doing something impressionistic and painterly.
To get this look: I started with a base of Sally Hansen White On, and I sponged on some medium blue along the top, light blue in the middle, and light green along the bottom. I just dabbed on the colours with bits of sponge until I had a gradient that I was satisfied with.
Then, I did a light sketch of my flowers in orange, which I thinned down. After that, I painted in the poppies with my red, and when that was dried, I added some highlights with an orange-red and shadows with a purple-red. The stems were painted with a darker green, then a touch of dark blue where I needed the darks to be emphasized.
After it dried I finished with a coat of KBShimmer Clearly On Top, then when that had dried, Essie Matte About You.
Polishes used:
Cover Girl Go-Go Mango: orange used for highlights on flowers
Essie Snap Happy: red for poppies
Essie The More the Merrier: lime green used for grass
Nubar Into the Wild: darker green used for grass, stems
Nubar My New Obsession: darker blue used for sky
Polished By Alexandra Beach Glass: light blue used for sky
Misa BreakAway: purple used for darkening the red and green
Essie Midnight Cami: deep blue, used only a touch to add dark edges on some stems
Tips for freehand painting: I like to thin my polishes with thinner to make them easy to work with. It's good to let things dry first before painting over them or adding highlights/shadows. Sometimes I like to use a drybrush technique. This is when you have hardly any polish on your brush and it makes a line that is broken. You can see this in the grass area.
Overall, I really love this design, but I'm hoping that I'm not cheating because my nails aren't completely red.
What do you think of this? Would a tutorial on freehand painting be useful or of interest?
---
---
 |
| Freehand poppies nail art |
About this design: Day one is red, and I originally planned some gradient/tape/stud skittle mani, but at the last minute changed my mind to do some flowers instead. Here I've done some red poppies, made to look like they are in some field. The original inspiration was the watercolours of Emile Nolde, or some vague memory I had of his watercolour paintings of flowers. But I was also thinking of a nail art design I did over the holidays, coniferous trees in the winter done in a painterly style. So I really liked the idea of doing something impressionistic and painterly.
 |
| Freehand poppies nail art |
 |
| Freehand poppies nail art |
To get this look: I started with a base of Sally Hansen White On, and I sponged on some medium blue along the top, light blue in the middle, and light green along the bottom. I just dabbed on the colours with bits of sponge until I had a gradient that I was satisfied with.
Then, I did a light sketch of my flowers in orange, which I thinned down. After that, I painted in the poppies with my red, and when that was dried, I added some highlights with an orange-red and shadows with a purple-red. The stems were painted with a darker green, then a touch of dark blue where I needed the darks to be emphasized.
After it dried I finished with a coat of KBShimmer Clearly On Top, then when that had dried, Essie Matte About You.
 |
| Freehand poppies nail art |
 |
| Freehand poppies nail art |
Polishes used:
Cover Girl Go-Go Mango: orange used for highlights on flowers
Essie Snap Happy: red for poppies
Essie The More the Merrier: lime green used for grass
Nubar Into the Wild: darker green used for grass, stems
Nubar My New Obsession: darker blue used for sky
Polished By Alexandra Beach Glass: light blue used for sky
Misa BreakAway: purple used for darkening the red and green
Essie Midnight Cami: deep blue, used only a touch to add dark edges on some stems
 |
| My "palette" and tiny workstation |
Tips for freehand painting: I like to thin my polishes with thinner to make them easy to work with. It's good to let things dry first before painting over them or adding highlights/shadows. Sometimes I like to use a drybrush technique. This is when you have hardly any polish on your brush and it makes a line that is broken. You can see this in the grass area.
Overall, I really love this design, but I'm hoping that I'm not cheating because my nails aren't completely red.
What do you think of this? Would a tutorial on freehand painting be useful or of interest?
---
---
29 April 2013
Seven Deadly Sins Challenge, Day 2: Lust
Hi everyone! It's very last minute but I was able to finish day two of the Seven Deadly Sins challenge. Since it's midnight and I still have a lot of work to do tonight, I'm going to keep this short.
The prompt for today was: "Let your body talk and feel free to do whatever you want." While this is very open ended, it still had to keep within the theme of lust. I had been doing some reading about the seven deadly sins (okay, just Wikipedia, whatevs) and I read that in Dante's Purgatorio the repentant sinner would walk amongst flames to rid himself of lustful feelings. Wow, talk about tough times. And of course flames themselves are also a symbol of lust and desire.
I started with a base of Pahlish Heart of Man, which is fitting since this was released for Valentine's Day. It's a dark burgundy jelly packed with magenta and holo glitter. It's quite gorgeous and rich on it's own. I used three coats for full opacity and had no issues with the formula.
For the flames I started with a blue base. For the blues I used a combination of Nubar Dusk Till Dawn, OPI...Eurso Euro, and OPI Can't Find My Czechbook. Then I added the white using Sally Hansen White On. I wanted flames that weren't completely stylized, but I knew I couldn't paint very realistic flames, so that's why I left some streaking and brushstrokes when I painted them. The heart stud is from the Born Pretty Store.
What do you think of these? What kind of design would you do for 'Lust'?
Thanks for reading! :)
The prompt for today was: "Let your body talk and feel free to do whatever you want." While this is very open ended, it still had to keep within the theme of lust. I had been doing some reading about the seven deadly sins (okay, just Wikipedia, whatevs) and I read that in Dante's Purgatorio the repentant sinner would walk amongst flames to rid himself of lustful feelings. Wow, talk about tough times. And of course flames themselves are also a symbol of lust and desire.
 |
| Blue flames nail design (seven deadly sins - lust) |
I started with a base of Pahlish Heart of Man, which is fitting since this was released for Valentine's Day. It's a dark burgundy jelly packed with magenta and holo glitter. It's quite gorgeous and rich on it's own. I used three coats for full opacity and had no issues with the formula.
 |
| Pahlish Heart of Man |
 |
| Pahlish Heart of Man |
For the flames I started with a blue base. For the blues I used a combination of Nubar Dusk Till Dawn, OPI...Eurso Euro, and OPI Can't Find My Czechbook. Then I added the white using Sally Hansen White On. I wanted flames that weren't completely stylized, but I knew I couldn't paint very realistic flames, so that's why I left some streaking and brushstrokes when I painted them. The heart stud is from the Born Pretty Store.
 |
| Blue flames nail design (seven deadly sins - lust) |
What do you think of these? What kind of design would you do for 'Lust'?
Thanks for reading! :)
21 March 2013
Born Pretty Store Review: Rhinestone Skittle Manicure
Hi everyone! I received two more goodies from the Born Pretty Store, one of which was a set of round clear rhinestones. Since rhinestones are a new thing for me, I had a hard time figuring out a design that still felt like "me". And after my first failed attempt that I mentioned on Monday, I didn't want to take too many risks. So I came up with this pastel / springtime skittle manicure that feels a bit similar to the pastel skittle manicure I did last week.
About this design: I started with a base of OPI My Vampire is Buff and Nicole by OPI Purple Yourself Together. I know I use MViB a lot, but it's now officially my go-to polish for nail art - I love it! I also wanted to try my new Lynnderella Crocus Pocus, which I used on my pinky, index and thumb. Crocus Pocus might be my new favourite Lynnderella. It has a beautiful mixture of metallic and neon glitter in a variety of shapes: hexes, squares, flowers, moons, and stars. The colours are predominantly lavender, purple, fuchsia, blue and white. And to top it off, there's a gorgeous iridescent shimmer! On my ring finger I painted a small crocus with Nubar Into the Wild, OPI OPI...Eurso Euro, and Purple Yourself Together. I'm trying out a new detail brush so I didn't want to go crazy with the freehand painting.
About the set: This is a set of round, clear, faceted rhinestones made out of acrylic. There's three sizes - 1.5mm, 2mm, and 3mm - with each one filling four slots of the storage wheel (there's 12 sections in a wheel). I don't know how many are in the set, but as you can see from the photo there's a generous helping in each slot, so perhaps a few hundred. I like that it comes with three sizes of rhinestones, which allows for some variations in your designs. I don't have anything bad to say about these, it's a good set and the rhinestones are fun to use.
Applying rhinestones: Instructions I got off the Internet call for you to apply some nail glue, place your rhinestones, seal with a bit more nail glue, then finish with top coat. I'm trying to avoid nail glue since it's a PITA to remove, so I used base coat instead of nail glue. A top coat would work as well. I'm only sort of happy with this method, they are fixed well, but I can see some imperfections and bubbles around the rhinestones. So I'll continue to experiment and get back to you.
The set is called "3 sizes round rhinestone nail art glitter decoration" but you can find the link to the product here. It's pretty affordable, and you can use my coupon code MSL91 and get 10% off. Full disclosure: I do not get compensated if you use the coupon code, but if enough people use it, the Born Pretty Store will sponsor a giveaway on my site.
What do you think of this? Have you used rhinestones in nail art before?
*Product provided for review, all opinions are my own. See my disclosure policy for more details.*
 |
| Rhinestone skittle manicure |
About this design: I started with a base of OPI My Vampire is Buff and Nicole by OPI Purple Yourself Together. I know I use MViB a lot, but it's now officially my go-to polish for nail art - I love it! I also wanted to try my new Lynnderella Crocus Pocus, which I used on my pinky, index and thumb. Crocus Pocus might be my new favourite Lynnderella. It has a beautiful mixture of metallic and neon glitter in a variety of shapes: hexes, squares, flowers, moons, and stars. The colours are predominantly lavender, purple, fuchsia, blue and white. And to top it off, there's a gorgeous iridescent shimmer! On my ring finger I painted a small crocus with Nubar Into the Wild, OPI OPI...Eurso Euro, and Purple Yourself Together. I'm trying out a new detail brush so I didn't want to go crazy with the freehand painting.
 |
| Rhinestone skittle manicure |
 |
| Rhinestone skittle manicure |
About the set: This is a set of round, clear, faceted rhinestones made out of acrylic. There's three sizes - 1.5mm, 2mm, and 3mm - with each one filling four slots of the storage wheel (there's 12 sections in a wheel). I don't know how many are in the set, but as you can see from the photo there's a generous helping in each slot, so perhaps a few hundred. I like that it comes with three sizes of rhinestones, which allows for some variations in your designs. I don't have anything bad to say about these, it's a good set and the rhinestones are fun to use.
 |
| Born Pretty Store three sizes rhinestone set |
Applying rhinestones: Instructions I got off the Internet call for you to apply some nail glue, place your rhinestones, seal with a bit more nail glue, then finish with top coat. I'm trying to avoid nail glue since it's a PITA to remove, so I used base coat instead of nail glue. A top coat would work as well. I'm only sort of happy with this method, they are fixed well, but I can see some imperfections and bubbles around the rhinestones. So I'll continue to experiment and get back to you.
 |
| Rhinestone skittle manicure |
The set is called "3 sizes round rhinestone nail art glitter decoration" but you can find the link to the product here. It's pretty affordable, and you can use my coupon code MSL91 and get 10% off. Full disclosure: I do not get compensated if you use the coupon code, but if enough people use it, the Born Pretty Store will sponsor a giveaway on my site.
What do you think of this? Have you used rhinestones in nail art before?
*Product provided for review, all opinions are my own. See my disclosure policy for more details.*
12 March 2013
Nubar My Sweet Escape Swatches and Review
Hi everyone! I'm very pleased to show you the new collection from Nubar. When I first saw the photos for this collection, before it was released, I was really intrigued. So when Katie from Harlow & Co. asked me if I was interested in swatching these for her, of course I said yes! :)
My Sweet Escape contains eight fun colours that each stand on their own, but also look great together. The colours really do suggest a fun spring break getaway, and they are a nice change from all the pastels that we are seeing this spring. There's definitely a colour in here for everyone! Some of these colours I might not wear on their own, but I enjoy them when paired with other colours from the collection.
But first a bit about the formula on these. All of these colours are cremes, and while there's some variations, I found them pretty easy to apply. They all went on very smooth and were perfectly self-levelling. They tend to be a bit sheer, however, so for all of them I'm showing you three coats plus one coat of Seche Vite. And a bonus - they are all non-staining.
From Dusk till Dawn: This is a dark blue with teal undertones. It is a shade darker than My New Obsession, but definitely not as dark as a midnight blue. This one was probably one of the thinnest in the collection and at first I thought it would be 4-5 coats. But nope, it was three coats like the rest!
Forbidden Fruit: A muted caramel orange that leans slightly towards red. I don't know if I would wear this on its own, but it looks amazing when paired with some of the blues in the collection.
Into the Wild: This is a muted kelly green. It's more opaque than the others and you could probably get away with two coats. The formula on this was perfect and it went on so smooth and creamy.
Jaded: A mid-value blue that leans towards teal. This was probably my favourite of the collection (surprise!), and it went on very smooth.
My New Obsession: This is a medium teal blue, very similar to Jaded, just a shade darker. This is also a favourite of mine, and it had one of the better formulas. You might be able to get away with two coats on this one as well.
On the Radar: A muted red-orange that leans more towards red than orange. This is in the same colour family as Forbidden Fruit, just more red. This one had one of the best formulas, it was very creamy and went on perfectly.
Resort Yellow: This is a bright lemon yellow. It is warm in tone, so it leans slightly towards orange. Out of all the polishes this was the only one that didn't completely level and you can see some very slight streakiness, but overall I think the formula is pretty good, especially for a yellow.
Sour Apple: This is a bright chartreuse. This one wants to photograph yellow, but it is definitely not close to Resort Yellow. I found this one to be a bit prone to cuticle drag (where the polish is thinner near the cuticles) so use a light hand.
Nubar is available from a number of retailers, but I got these from Harlow & Co. They retail for $9 (USD) each.
What do you think of these? I'm planning to do a comparison post, so if you have any suggestions/requests for comparisons, let me know in the comments below.
*Products provided to swatch and review, all opinions are my own. See my disclosure policy for more details.*
My Sweet Escape contains eight fun colours that each stand on their own, but also look great together. The colours really do suggest a fun spring break getaway, and they are a nice change from all the pastels that we are seeing this spring. There's definitely a colour in here for everyone! Some of these colours I might not wear on their own, but I enjoy them when paired with other colours from the collection.
 |
| Nubar My Sweet Escape |
But first a bit about the formula on these. All of these colours are cremes, and while there's some variations, I found them pretty easy to apply. They all went on very smooth and were perfectly self-levelling. They tend to be a bit sheer, however, so for all of them I'm showing you three coats plus one coat of Seche Vite. And a bonus - they are all non-staining.
From Dusk till Dawn: This is a dark blue with teal undertones. It is a shade darker than My New Obsession, but definitely not as dark as a midnight blue. This one was probably one of the thinnest in the collection and at first I thought it would be 4-5 coats. But nope, it was three coats like the rest!
 |
| Nubar From Dusk till Dawn |
 |
| Nubar From Dusk till Dawn |
Forbidden Fruit: A muted caramel orange that leans slightly towards red. I don't know if I would wear this on its own, but it looks amazing when paired with some of the blues in the collection.
 |
| Nubar Forbidden Fruit |
 |
| Nubar Forbidden Fruit |
Into the Wild: This is a muted kelly green. It's more opaque than the others and you could probably get away with two coats. The formula on this was perfect and it went on so smooth and creamy.
 |
| Nubar Into the Wild |
 |
| Nubar Into the Wild |
Jaded: A mid-value blue that leans towards teal. This was probably my favourite of the collection (surprise!), and it went on very smooth.
 |
| Nubar Jaded |
 |
| Nubar Jaded |
My New Obsession: This is a medium teal blue, very similar to Jaded, just a shade darker. This is also a favourite of mine, and it had one of the better formulas. You might be able to get away with two coats on this one as well.
 |
| Nubar My New Obsession |
 |
| Nubar My New Obsession |
On the Radar: A muted red-orange that leans more towards red than orange. This is in the same colour family as Forbidden Fruit, just more red. This one had one of the best formulas, it was very creamy and went on perfectly.
 |
| Nubar On the Radar |
 |
| Nubar On the Radar |
Resort Yellow: This is a bright lemon yellow. It is warm in tone, so it leans slightly towards orange. Out of all the polishes this was the only one that didn't completely level and you can see some very slight streakiness, but overall I think the formula is pretty good, especially for a yellow.
 |
| Nubar Resort Yellow |
 |
| Nubar Resort Yellow |
Sour Apple: This is a bright chartreuse. This one wants to photograph yellow, but it is definitely not close to Resort Yellow. I found this one to be a bit prone to cuticle drag (where the polish is thinner near the cuticles) so use a light hand.
 |
| Nubar Sour Apple |
 |
| Nubar Sour Apple |
Nubar is available from a number of retailers, but I got these from Harlow & Co. They retail for $9 (USD) each.
What do you think of these? I'm planning to do a comparison post, so if you have any suggestions/requests for comparisons, let me know in the comments below.
*Products provided to swatch and review, all opinions are my own. See my disclosure policy for more details.*
21 December 2012
Advent Calendar Nail Challenge, Day 15: Something Cozy
Hi everyone! I'm back with another advent calendar challenge. I still have a bunch of work that I'm trying to get done before Christmas so that I can take a week off for the holidays, but hopefully I'll be able to get a few more challenges done over the next couple of days.
The theme for day 15 is "something cozy", so I took my idea of the perfect cozy winter's evening, and used the concept of the skittle manicure to create the scene. A skittle manicure refers to either a manicure where the nails are painted different colours, or for nail art, where each nail has a different design, but the nails work together as a cohesive whole.
I'm kind of a homebody, so my cozy winter's evening consists of the following: (1) looking out the window at gently falling snow; (2) cozy striped socks; (3) hot beverage, either tea or hot cocoa; and (4) nice music playing. Isn't it just...cozy?! I thought about doing a book on my pinky, since I'm more likely to read than listen to music, but I figured it wouldn't look that good.
I started with a base of Revlon Midnight Affair on all four nails. Midnight Affair is a dark navy with a lighter blue shimmer. Here's a breakdown of colours and how I did each nail:
1. Gently Falling Snow (index):
I sponged Essie Blue Rhapsody on 3/4 of the nail to create a gradient. Then I sponged Sally Hansen Xtreme Wear White On, just on the tips to heighten the gradient. When that was dry I finished with a coat of Nubar White Polka Dot for the snow.
2. Cozy Striped Socks (middle):
I did this freehand with a wide flat nail art brush. The colours I used are (from top to bottom): Essence Black is Back, White On, Sally Hansen Xtreme Wear Grey Area, Essie Chinchilly, then Black is Back again on the tip. I didn't get it right the first time, so I had to wait for the stripes to dry, go over them again, and then even do some touch ups with a detail brush. Thank goodness for the top coat, which helped to make it look better.
3. Hot Beverage (ring):
I painted the mug freehand with a detail brush using White On again. I drew the outline first, sponged on a bit of white for the steam, and then filled in the mug with white. And if you look closely, there's a touch of Grey Area inside the mug for the beverage. :D
4. Music (pinky):
The music notes were very simple, they were done freehand with a detail brush. It's not completely perfect but you have to look at the notes up close to see the imperfections.
So what do you think of my first skittle mani? Overall, I like the idea of doing more of these. Also, I still want to work on getting better when it comes to freehand nail art, and I think slowly I'm starting to feel a bit more comfortable with it.
The theme for day 15 is "something cozy", so I took my idea of the perfect cozy winter's evening, and used the concept of the skittle manicure to create the scene. A skittle manicure refers to either a manicure where the nails are painted different colours, or for nail art, where each nail has a different design, but the nails work together as a cohesive whole.
 |
| Cozy winter's evening mani |
I'm kind of a homebody, so my cozy winter's evening consists of the following: (1) looking out the window at gently falling snow; (2) cozy striped socks; (3) hot beverage, either tea or hot cocoa; and (4) nice music playing. Isn't it just...cozy?! I thought about doing a book on my pinky, since I'm more likely to read than listen to music, but I figured it wouldn't look that good.
I started with a base of Revlon Midnight Affair on all four nails. Midnight Affair is a dark navy with a lighter blue shimmer. Here's a breakdown of colours and how I did each nail:
1. Gently Falling Snow (index):
I sponged Essie Blue Rhapsody on 3/4 of the nail to create a gradient. Then I sponged Sally Hansen Xtreme Wear White On, just on the tips to heighten the gradient. When that was dry I finished with a coat of Nubar White Polka Dot for the snow.
 |
| Cozy winter's evening mani |
2. Cozy Striped Socks (middle):
I did this freehand with a wide flat nail art brush. The colours I used are (from top to bottom): Essence Black is Back, White On, Sally Hansen Xtreme Wear Grey Area, Essie Chinchilly, then Black is Back again on the tip. I didn't get it right the first time, so I had to wait for the stripes to dry, go over them again, and then even do some touch ups with a detail brush. Thank goodness for the top coat, which helped to make it look better.
3. Hot Beverage (ring):
I painted the mug freehand with a detail brush using White On again. I drew the outline first, sponged on a bit of white for the steam, and then filled in the mug with white. And if you look closely, there's a touch of Grey Area inside the mug for the beverage. :D
4. Music (pinky):
The music notes were very simple, they were done freehand with a detail brush. It's not completely perfect but you have to look at the notes up close to see the imperfections.
 |
| Cozy winter's evening mani |
So what do you think of my first skittle mani? Overall, I like the idea of doing more of these. Also, I still want to work on getting better when it comes to freehand nail art, and I think slowly I'm starting to feel a bit more comfortable with it.