
 |
| Snowy country landscape nail art |
Last year around this time I did a snowy landscape with coniferous trees. At the time I was very new to nail art and my finished design looked more like a landscape painting than what I thought nail art should look like. I remember thinking that no one would really like it but me, so I was surprised that I got a lot of positive comments on it. The fact that it looks like a painting was exactly what appealed to people.
 |
| Snowy country landscape nail art |
 |
| Snowy country landscape nail art |
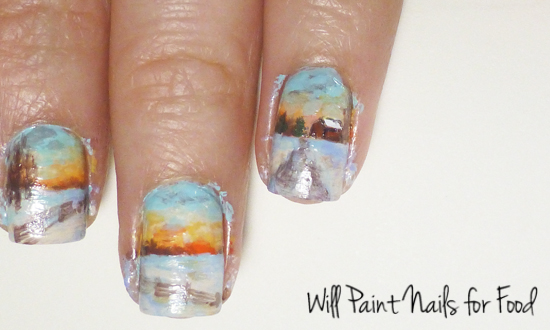
So I took my design from last year as a starting point. But I wanted to paint a landscape that had more colour and more details. I wanted it to look even more like an impressionist painting. The finished landscape looks like your quintessential country landscape with the red/brown barn, sunset, and rustic fence. Yet, I really love how it turned out. Especially when compared to my design from last year, I see the improvement in my nail art skills.
 |
| Snowy country landscape nail art |
I prepared a short tutorial to show you step-by-step how I did this design. I hope you find it helpful. In case you just want to know the polishes I used, here's a complete list:
- OPI My Vampire is Buff (off-white/cream)
- Sally Hansen Blue-Away (light blue)
- OPI You Don't Know Jacques! (brown)
- OPI You're Such a BudaPest (lavender)
- Sally Hansen Breezy Blue (very, very light blue)
- Sally Hansen Firey Island (orange)
- Sally Hansen White On (white)
- Sally Hansen Black Out (black)
- Sally Hansen Lightening (yellow)
If you like this design, I would really appreciate it if you voted for me. The voting page can be found here.
Tutorial

For this design you will need:
- A mid-length detail brush. If you have a very fine brush you can do the entire design with just the one brush.
- Nail polish thinner. I always add a bit of thinner when painting freehand designs. It makes the polish more fluid and easier to work with.
- Polishes. For this design you will need white, black, light blue, off-white/cream, brown, lavender, yellow, orange, and green.
Step #1. Sketch the scene. Starting with a light base colour, sketch out your design in a brown colour. Use nail polish thinner to make the polish lighter and easier to sketch with.
 |
| Step #1 |
Step #2. Paint the sky. Use your blue, orange, and yellow to paint in the sky. You will also need a white or a lighter colour to lighten up the colours in certain areas. It's good to start from one end of the sky and work your way towards the other end - I started with the blue and worked my way towards the orange on each nail. Use dabs to keep the colours loose and painterly. A touch of brown mixed with light blue was used to add the dark streaks to the sky.
Tip: If your paint is building up too much and you find your surface is getting mucky - where the polish is starting to pull off - dip your brush in acetone and smooth it out. Let it sit 30 seconds then continue working.
 |
| Step #2 |
Step #3. Paint your snow. Painting the snow is very similar to painting the sky - dab on the colours and keep it loose. I used light blue and lavender for the cool areas, and cream/off-white for the lighter areas. At this point the design looks like a bit of a mess, but that's only because it's lacking in details and definition.
Tip: It helps when painting in this style to think about things in terms of warm and cool colours, highlights and shadows, not "I need to paint snow".
 |
| Step #3 |
Step #4. Paint your trees. Add the trees to the horizon line, and other areas. Most of the trees were painted in brown, but a few pine trees were painted in a deep evergreen. Use a very light touch so that they look like they are far away.
 |
| Step #4 |
Step #5. Paint your barn. It's starting to look like a landscape now! Paint in the barn using a red or red-brown for the building, and white for the roof. If you mess up, you can always do touch ups around it. Add a very, very thin line of black on the edges for definition.
 |
| Step #5 |
Step #6 (not shown - sorry! - see final design) Add the fence and snow on the trees. I painted in the fence with brown, first sketching it out (my initial sketch was covered up when I painted the snow). Then I went over it in brown again to define it. To give it more emphasis, I lightly dragged black on the bottom of the lines, and white on the top. It gives the impression of a fence with snow on it. The pine trees have snow on them, so I added touches of white.
I finished with a thick layer of clear coat. I decided not to use matte top coat this time, but that would be another good choice for this design.
 |
| Snowy country landscape nail art |
What do you think of this design? Do you like landscapes-as-nail-art? Don't forget to vote for your favourite design!
Beautiful work! wow!
ReplyDeleteThanks so much Natalie! :)
Deletewhat ?? i love it :)) greaaaaat!!! good inspiration
ReplyDeleteHaha! Thanks LacquerVictims!
Deleteoh my. this is gorgeous. you are really talented!
ReplyDeleteAwww... thank you Viktoria, that is sweet! <3
DeleteOh, my, gosh....
ReplyDeleteThis is some of the most beautiful nail art I have ever seen. I cannot find the right words to tell you how much I love this. O_O
Wow! Thank you Ashesela! No right words necessary, your comment still means a lot to me. :)
Deletethis is amazing! a real art on the nails! I'm stunned! <3
ReplyDeleteThanks so much Tamit24! :)
DeleteWoah O.o I am very impressed! Stunning!
ReplyDeleteAwww thanks Deborah! :)
DeleteThis is absolutely amazingly beautiful!! <3 How long did this take you to do?
ReplyDeleteThanks so much Patricia! I think it took about 4/4.5 hours but that included cleanup and photographing the final mani. :)
DeleteThis is sickeningly good!!!
ReplyDeleteThanks so much Emily!! ... I think... ;)
DeleteWOW, just... wow
ReplyDeleteEhm... this must be the most amazing, gorgeous nail art I've ever seen! Thank you so much for sharing so much of the process as well =)
ReplyDeleteOh my gosh this is absolutely gorgeous!!! Thank you for the tutorial!
ReplyDeleteThis is amazing!
ReplyDeleteGorgeous!!
ReplyDeleteWow, this is STUNNING, really quite exceptional!
ReplyDeletePretty sure I shouldn't even bother to enter now ;)
ReplyDeleteThis is so beyond amazing, girl! Great work!
Wow this is beautiful! You've made your nails like an art canvas, I can't believe how good it is despite being so small!
ReplyDeleteHoly freaking cow! I'm an artist and I'm just blown away by this. Do you ever do canvas paintings?
ReplyDeleteyou're stunning girl... So talented, you can be proud of urself !
ReplyDeleteCan't I withdraw my entry?! Haha this is amazing if you don't win I'll be disappointed!!!
ReplyDeleteholy cow this is good! you have the steadiest hand in the world!!
ReplyDeleteThis is amazing! This makes me want to go out and buy a whole bunch of nail polishes!
ReplyDeleteThis looks gorgeous! I'll have to try it sometime, though undoubtedly it won't look as good as yours... :)
ReplyDeletevoted for your nail art :) :)
ReplyDeleteWow! This is perfect!
ReplyDeleteVery beautifully painted! And interesting to see the step by step photos. :-)
ReplyDeleteUm, wow! These are so beautiful! Just, wow!
ReplyDeleteYou are such an amazing artist! I always look forward to seeing your work!! =)
ReplyDeleteI see intricate designs like this and i think I COULD NEVER DO THAT! Thanks for the tutorial... maybe i can do it!!! :)
ReplyDeleteLooks great!
This is so amazing :) . I really love it. It would be a shame to take it off.
ReplyDeleteVocê é uma verdadeira artista!!!!
ReplyDeleteBeijos!!!!