Hi everyone! I've been looking forward to galaxies day since the beginning of the challenge. Even though I've done a few galaxy manicures, I still feel like it's something I can improve on. Despite being a seemingly straightforward technique - sponge on some lights, some darks, paint some stars, etc. - there are infinite varieties, and subtle nuances can make or break a design.
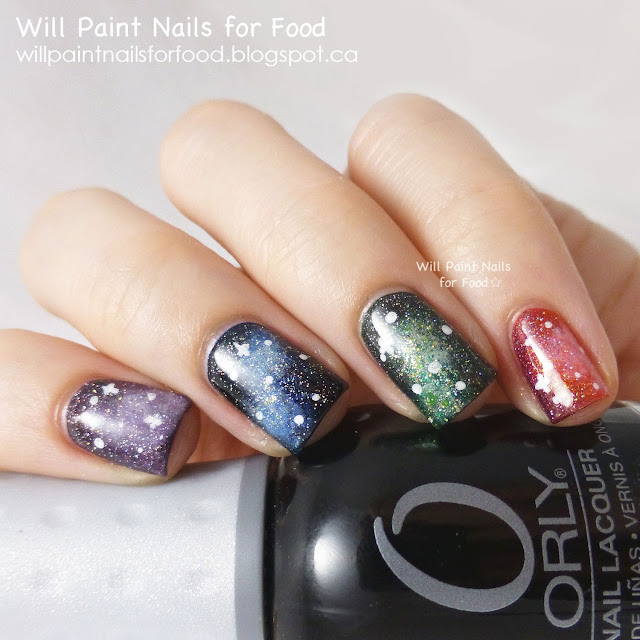 |
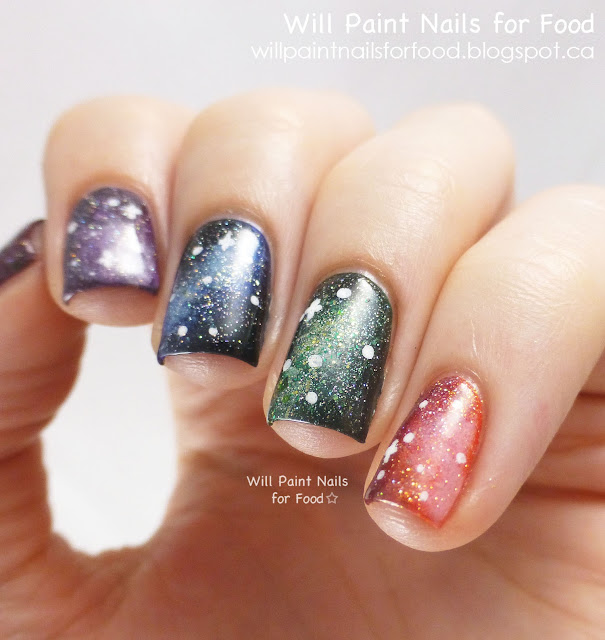
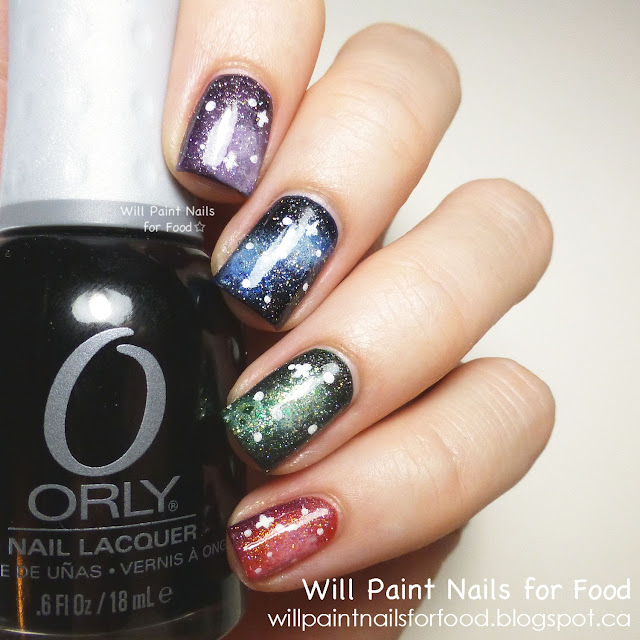
| Rainbow Galaxies Nail Art |
About this design: Normally I do a blue-black based galaxy nails design, but this time I decided to do various colours. The idea of a rainbow galaxy nails design came from
@superflynails on Instagram, she does the most amazing galaxy nails!
 |
| Rainbow Galaxies Nail Art |
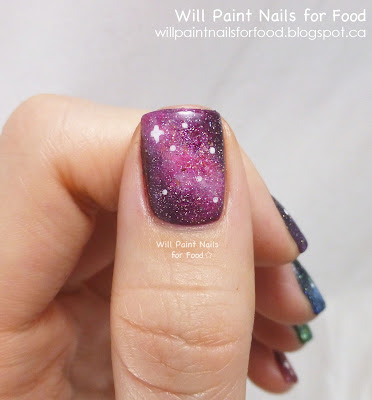 |
| Thumb: Magenta Galaxy |
To get this look: The technique for galaxy nails is pretty straightforward: start with a dark-ish base and build up your lights and darks by sponging on touches of colour with small pieces of makeup sponge. There are plenty of tutorials so I won't go into details, rather I thought it would be better to let you know what polishes I used. The list is quite extensive, so let me know if anything is not clear:
 |
| Rainbow Galaxies Nail Art |
- Magenta galaxy (thumb):
- China Glaze Don't Make Me Wine
- OPI Extravagance
- Essie Super Bossa Nova
- Zoya Bobbi
- Models Own Pastel Pink
- Purple Galaxy (index)
- Misa BreakAway
- China Glaze Rendezvous With You
- Essie Full Steam Ahead
- Blue Galaxy (middle)
- Essie Midnight Cami
- piCture pOlish Hope
- Sally Hansen Blue It
- Zoya Hazel
- Essie Rock the Boat
- Green Galaxy (ring)
- piCture pOlish Kryptonite
- Nubar Into the Wild
- Pahlish Stroke of Luck
- Zoya Rikki
- Orange Galaxy (pinky)
- Sally Hansen Crushed
- Sally Hansen Firey Island
- Zoya Amy
 |
| Rainbow Galaxies Nail Art (direct light) |
- Other polishes used:
- OPI My Vampire is Buff: Used for the lightest areas in each of the galaxies, mix with a bit of colour to tone it down, or dab it into the wet polish
- Orly Liquid Vinyl and OPI My Private Jet: Mixed with a bit of colour and used for the darkest areas on each nail. The exception is the orange galaxy where I used My Private Jet and OPI Extravagance for the dark area
- Sally Hansen White On: Used for the stars
- China Glaze Fairy Dust: One coat used over finished design and before top coat
 |
| Rainbow Galaxies Nail Art |
Whew! I know that's a long list of polishes, but basically you just want to select 3-5 polishes for each nail in a range of values - some lighter some darker. They don't have to be the exact same shade, but I did make sure the colours complemented each other. It's also nice to have a range of finishes - shimmer, holo, metallic, foil, etc. to get a good range of effects.
What do you think of this design? Do you like variations on the classic galaxy nails design?
---


Your variations are gorgeous!! Definitely a good idea! :)
ReplyDeleteThanks very much Gillian! It was also really fun to do, I'll probably try it again someday. :)
Deletea way to go when you can't decide on a colour :D I think pinky is my favorite, but I would go with magenta for a full mani (yea, can't decide)
ReplyDeleteLol! And the great thing is that you don't even have to decide! I'm bad at deciding as well. :P
DeleteVery beautiful!!
ReplyDeleteThank you very much Anastasia!
DeleteQuite spectacular!!!
ReplyDeleteThanks Embee Nails! I really appreciate it. :)
DeleteI really like this one, beautiful! loove the green and orange :)
ReplyDeleteThanks so much Lina! It's interesting to hear which nails people like the most! :D
DeleteStunning!
ReplyDeleteThank you! :)
Deleteomg , stunning girl , you took my breath away i m going to recreate it once my nubby grows lol !
ReplyDeleteRock those nubbins!! And I hope you get a chance to recreate them!
DeleteAnd thanks so much for the sweet comment. :)
Rainbow Galaxies? Love it!
ReplyDeleteHaha! Thanks so much Aglaya! :)
DeleteI love these so much ♥♥♥
ReplyDeleteAwww... thanks Deborah! :) <3
Deletethis is sooo awesome!
ReplyDeleteThanks so much Shine Eye! :)
Deletethis looks so gorgeous :) my favorite is the pinky :) <3
ReplyDeleteThanks so much! Glad that you enjoyed the design. :)
Delete